ShopDreamUp AI ArtDreamUp
Deviation Actions


Description
*First of all THANK YOU everyone who've given great feedbacks to my first hair tutorial[link] I really appreciate it.
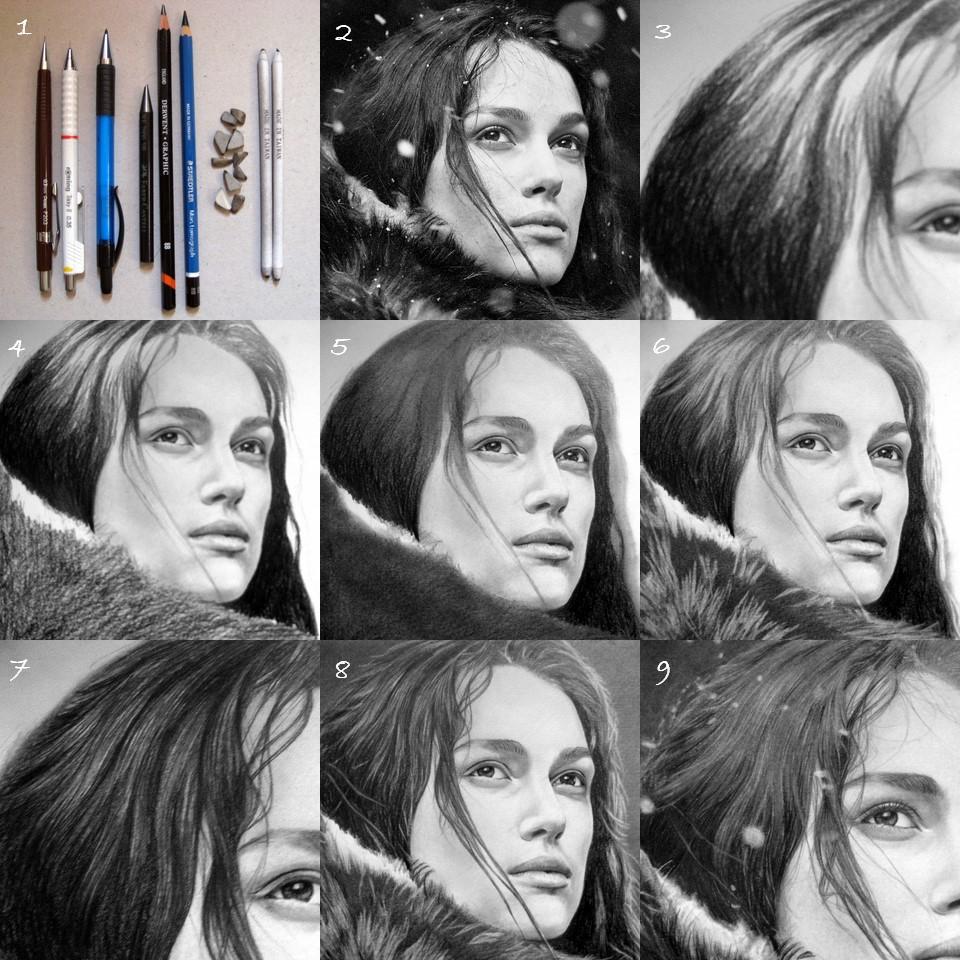
please ignore the face as it's only half finished when I started doing the hair. Sorry for the inconsistent lighting as the light changed all the time during the day when I took the photos.
1. My tools, from left to right: HB & B 0.3 Mech pencil, 2B 0.5 Mech pencil, 9B graphite stick (to render the big area), 8B/9B Derwent Graphic (for medium to dark lines/shading), 8B Staedtler Mars Lumograph (for the darkest shade of black), Sharpened erasers (just normal erasers cut into small pieces in triangle shape), blending sticks
2. The reference picture
3.- 4. Sketch the hair and try to divide it into sections. Use the SECOND darkest pencil you have (mine is 8B/9B Derwent graphic) render the dark to darkest area. Try to keep the pencil stroke in the same direction as the hair strands (see the picture no. 3).
5. Blend the darker part towards the lighter parts using tissue paper (not your finger, NEVER use your finger ) and blending stick (for the narrow sections).
6. Use the sharp edge of the erasers creating the strands. Do this in sections starting from left to right. Make sure you follow the direction of hair strands from the ref. You can do this quickly and roughly as it's to be used mainly as the base for step 7.
7. Add the strands using mech pencil for the lighter areas and the second darkest pencil you have (mine is 8B/9B Derwent graphic) for the darker areas and shadow.
8. Add highlight, light strands, & light flyaway hair using sharpened erasers. This time make sure the erasers are sharp as they'll give a lot better result.
**I needed to add the snowflakes after this stage**
9. Render the darkest areas and add the shadow between & underneath each hair layer using the darkest pencil you have (Mine is 8B Staedtler Mars Lumograph). Define the strands that look too chunky with 0.3 mech pencils. Also use 0.3 mech pencil to add the fly away hairs.
So there you go...again.. Here is the finished drawing--> [link]
*Please feel free to ask me if you have any questions.
NOTE: I did the hair and the fur at the same time so you can see the progressions on the fur as well. If you're curiouse how I did the fur please read my tutorial for light hair --> [link] as I did them EXACTLY the same way.
please ignore the face as it's only half finished when I started doing the hair. Sorry for the inconsistent lighting as the light changed all the time during the day when I took the photos.
1. My tools, from left to right: HB & B 0.3 Mech pencil, 2B 0.5 Mech pencil, 9B graphite stick (to render the big area), 8B/9B Derwent Graphic (for medium to dark lines/shading), 8B Staedtler Mars Lumograph (for the darkest shade of black), Sharpened erasers (just normal erasers cut into small pieces in triangle shape), blending sticks
2. The reference picture
3.- 4. Sketch the hair and try to divide it into sections. Use the SECOND darkest pencil you have (mine is 8B/9B Derwent graphic) render the dark to darkest area. Try to keep the pencil stroke in the same direction as the hair strands (see the picture no. 3).
5. Blend the darker part towards the lighter parts using tissue paper (not your finger, NEVER use your finger
6. Use the sharp edge of the erasers creating the strands. Do this in sections starting from left to right. Make sure you follow the direction of hair strands from the ref. You can do this quickly and roughly as it's to be used mainly as the base for step 7.
7. Add the strands using mech pencil for the lighter areas and the second darkest pencil you have (mine is 8B/9B Derwent graphic) for the darker areas and shadow.
8. Add highlight, light strands, & light flyaway hair using sharpened erasers. This time make sure the erasers are sharp as they'll give a lot better result.
**I needed to add the snowflakes after this stage**
9. Render the darkest areas and add the shadow between & underneath each hair layer using the darkest pencil you have (Mine is 8B Staedtler Mars Lumograph). Define the strands that look too chunky with 0.3 mech pencils. Also use 0.3 mech pencil to add the fly away hairs.
So there you go...again..
*Please feel free to ask me if you have any questions.
NOTE: I did the hair and the fur at the same time so you can see the progressions on the fur as well. If you're curiouse how I did the fur please read my tutorial for light hair --> [link] as I did them EXACTLY the same way.
Image size
960x960px 151.5 KB
© 2008 - 2024 akaLilith
Comments280
Join the community to add your comment. Already a deviant? Log In
Awesome! Also attended Workshop with Penkraft where I learnt Pencil shading. If anyone wants to attend the same so here's the link.
